OCI コンソールの接続元IPアドレスの制限とCLIからの解除
目次
やること
- OCIコンソールにログインを許可する接続元のIPアドレスを制限
- 接続元IP制限で誤ってコンソールログインできなくなってしまった場合の制限解除
接続元の制限
ネットワーク・ソースの作成
ネットワーク・ソースに遷移

ネットワーク・ソースの作成

項目を入力して作成を押下します。
- OCI以外からのアクセスを許可する場合は、接続元のCIDRブロックを指定します。(パブリックIP)

認証設定
- 「認証設定」に遷移します。

- 認証設定の編集

- 作成したネットワーク・ソースを選択し保存します。

接続確認
一度ログアウトし、ネットワークを切り替えてログインを試みます。
- 認証設定の管理 ネットワーク・ソース制限に対する変更が有効になるタイミング
ネットワーク・ソース制限が定義されると、コンソールにサインインしているユーザーは現在のセッションを続行できますが、サインアウト後、次回サインインしようとしたときにネットワーク制限が適用されます。

制限解除
- 「事前設定」、「事前確認」については「接続元の制限」を行う前にやっておきましょう。
※環境変数$tenant_idも事前に設定しています。
事前設定
- APIキーの設定が行われていることを確認します。
OCICLIの初期設定時に設定されているはずです。
「プロファイル」メニュー から「ユーザー設定」→「APIキー」タブを選択し、
OCICLIの初期設定で設定したキーが表示されていれば問題ありません。

事前確認
- ネットワーク・リソースを設定する前の設定を確認しておきます。
$ oci iam authentication-policy get --compartment-id $tenant_id
{
  "data": {
    "compartment-id": "ocid1.tenancy.oc1.****",
    "network-policy": {
      "network-source-ids": []
    },
    "password-policy": {
      "is-lowercase-characters-required": true,
      "is-numeric-characters-required": true,
      "is-special-characters-required": true,
      "is-uppercase-characters-required": true,
      "is-username-containment-allowed": false,
      "minimum-password-length": 8
    }
  },
  "etag": "bea7c39e38d4ee6176c31bcbdae9b955e97fdc68"
}
OCICLIから制限解除
- では実際に解除します。
input.json で使用するフォーマットを確認します。
$ oci iam authentication-policy update --compartment-id $tenant_id --generate-full-command-json-input
{
  "compartmentId": "string",
  "force": true,
  "ifMatch": "string",
  "networkPolicy": {
    "networkSourceIds": [
      "string",
      "string"
    ]
  },
  "passwordPolicy": {
    "isLowercaseCharactersRequired": true,
    "isNumericCharactersRequired": true,
    "isSpecialCharactersRequired": true,
    "isUppercaseCharactersRequired": true,
    "isUsernameContainmentAllowed": true,
    "minimumPasswordLength": 0
  }
}
- 上記をもとにinput.jsonを作成します。今回は以下の様にします。
$ cat input.json
{
  "compartmentId": "ocid1.tenancy.oc1..****",
  "force": true,
  "networkPolicy": {
    "networkSourceIds": []
  },
  "passwordPolicy": {
    "isLowercaseCharactersRequired": true,
    "isNumericCharactersRequired": true,
    "isSpecialCharactersRequired": true,
    "isUppercaseCharactersRequired": true,
    "isUsernameContainmentAllowed": false,
    "minimumPasswordLength": 8
  }
}
- 以下を実行し、ネットワーク・ソースの設定を解除します
$ oci iam authentication-policy update --compartment-id $tenant_id --from-json file://input.json


$ oci iam authentication-policy get --compartment-id $tenant_id
参考
Oracle Database 実行計画を実行統計付きで取得
目次
取得方法
alter session set statistics_level = ALL;

-- 実行計画確認対象のSQL
select * from t1 where c1 = 1;

set line 200 pages 1000 tab off
select * from table(DBMS_XPLAN.DISPLAY_CURSOR(format=>'ALL ALLSTATS LAST'));
取得結果
PLAN_TABLE_OUTPUT
--------------------------------------------------------------------------------------------------------------------------------------------------------------------------------------------------------
SQL_ID  3c3yp27cag5mv, child number 0
-------------------------------------
select * from t1 where c1 = 1

Plan hash value: 1141790563

-------------------------------------------------------------------------------------------------------------------------------
| Id  | Operation                   | Name  | Starts | E-Rows |E-Bytes| Cost (%CPU)| E-Time   | A-Rows |   A-Time   | Buffers |
-------------------------------------------------------------------------------------------------------------------------------
|   0 | SELECT STATEMENT            |       |      1 |        |       |     1 (100)|          |      1 |00:00:00.01 |       3 |
|   1 |  TABLE ACCESS BY INDEX ROWID| T1    |      1 |      1 |    26 |     1   (0)| 00:00:01 |      1 |00:00:00.01 |       3 |
|*  2 |   INDEX UNIQUE SCAN         | PK_T1 |      1 |      1 |       |     1   (0)| 00:00:01 |      1 |00:00:00.01 |       2 |
-------------------------------------------------------------------------------------------------------------------------------

Query Block Name / Object Alias (identified by operation id):
-------------------------------------------------------------

   1 - SEL$1 / T1@SEL$1
   2 - SEL$1 / T1@SEL$1

Predicate Information (identified by operation id):
---------------------------------------------------

   2 - access("C1"=1)

Column Projection Information (identified by operation id):
-----------------------------------------------------------

   1 - "C1"[NUMBER,22], "T1"."C2"[NUMBER,22]
   2 - "T1".ROWID[ROWID,10], "C1"[NUMBER,22]


31 rows selected.

SQL>
Mac Book Air の設定メモ
今後の買換えた時などのためにメモしておきたい。
目次
隠しファイルの表示
$ defaults write com.apple.finder AppleShowAllFiles TRUE
## 確認
$ defaults read com.apple.finder AppleShowAllFiles
TRUE
terminal 環境変数ファイル
~ % ls -lda .z*
-rw-r--r--   1 hiroshi  staff    45  1 20 23:16 .zprofile
-rw-------   1 hiroshi  staff  2433  1 22 01:20 .zsh_history
drwx------  28 hiroshi  staff   896  1 22 01:24 .zsh_sessions
-rw-r--r--   1 hiroshi  staff    36  1 20 22:27 .zshrc
- .zprofile
if [ -f ~/.zshrc ]; then
    . ~/.zshrc
fi
- .zshrc
alias ll="ls -l"
alias rm="rm -i"
MacOS Catalinaはデフォルトのログインシェルがbashではないらしい。
hosts の設定
Linuxでいうところの/etc/hosts の編集に相当することは以下で実施できる様です。
sudo vi /private/etc/hosts
terminalのログ取得設定
script ~/99_terminallog/terminal_`openssl rand -hex 2`_`date +%Y_%m_%d_%H%M%S`.log

Homebrew
macOS(またはLinux)用パッケージマネージャー — Homebrew
$ /bin/bash -c "$(curl -fsSL https://raw.githubusercontent.com/Homebrew/install/HEAD/install.sh)"
...
...
...
==> Next steps:
- Run these two commands in your terminal to add Homebrew to your PATH:
    echo 'eval "$(/opt/homebrew/bin/brew shellenv)"' >> /Users/hiroshi/.zprofile
    eval "$(/opt/homebrew/bin/brew shellenv)"
- Run brew help to get started
- Further documentation:
    https://docs.brew.sh
hiroshi@hiroshinoMacBook-Air ~ %  echo 'eval "$(/opt/homebrew/bin/brew shellenv)"' >> /Users/hiroshi/.zprofile
hiroshi@hiroshinoMacBook-Air ~ % cat ~/.zprofile

if [ -f ~/.zshrc ]; then
    . ~/.zshrc
fi

eval "$(/opt/homebrew/bin/brew shellenv)"
hiroshi@hiroshinoMacBook-Air ~ % eval "$(/opt/homebrew/bin/brew shellenv)"
hiroshi@hiroshinoMacBook-Air ~ %
hiroshi@hiroshinoMacBook-Air ~ % which brew
/opt/homebrew/bin/brew
visual-studio-code
hiroshi@hiroshinoMacBook-Air ~ % brew search visual-studio-code
==> Casks
homebrew/cask-versions/visual-studio-code-insiders
hiroshi@hiroshinoMacBook-Air ~ % brew install visual-studio-code --cask
==> Tapping homebrew/cask
Cloning into '/opt/homebrew/Library/Taps/homebrew/homebrew-cask'...
remote: Enumerating objects: 618333, done.
remote: Counting objects: 100% (16/16), done.
remote: Compressing objects: 100% (14/14), done.
remote: Total 618333 (delta 6), reused 11 (delta 2), pack-reused 618317
Receiving objects: 100% (618333/618333), 282.63 MiB | 10.49 MiB/s, done.
Resolving deltas: 100% (437277/437277), done.
Tapped 3957 casks (4,028 files, 302.4MB).
==> Downloading https://update.code.visualstudio.com/1.63.2/darwin-arm64/stable
==> Downloading from https://az764295.vo.msecnd.net/stable/899d46d82c4c95423fb7e10e68eba52050e30ba3/VSCode-darwin-arm64.
######################################################################## 100.0%
==> Installing Cask visual-studio-code
==> Moving App 'Visual Studio Code.app' to '/Applications/Visual Studio Code.app'
==> Linking Binary 'code' to '/opt/homebrew/bin/code'
🍺  visual-studio-code was successfully installed!
vimのエミュレーター
VSCode Neovim - Visual Studio Marketplace
brew install neovim
vimのキー移動で長押しの有効化
defaults write com.microsoft.VSCode ApplePressAndHoldEnabled -bool false

VSCodeでキーボードの長押しができなくなったときの対処方法 | book-reviews.blog
Docker上の開発環境
これをやりたい。
M1 Mac で Python環境 (Docker + VSCode編)
DockerをHomebrewでMac OSに導入する方法 - Qiita
brew install --cask docker
OCI上に検証用のOracle Databaseを立てる
目次
- 目次
- はじめに
- VMの作成
- 接続元IPアドレスの制限
- OS設定
- 環境変数ファイルの作成
- インストール
- リスナー起動
- DB作成
- 接続確認
- tnsnames.oraの設定
- 自動起動設定
- PDB自動起動設定
はじめに
Oracle Database の検証用として次のコンセプトでDBを作成したいと思います。
- 気軽に触れる
- 維持が面倒でない(PCの容量を取らない)
- お金をかけたくない
- OSも触れる
小さめのVMを作成して、その上にサイレント・インストールで Single DBを立てます。
DB作成の手順はこちらを参考にします。
ORACLE-BASE - Oracle Database 19c Installation On Oracle Linux 7 (OL7)
VMの作成
VMのImage、シェイプは以下の様にしました。
- Image : Oracle-Linux-7.9-2021.12.08-0
- Shape : VM.Standard.E4.Flex
- OCPU: 2
- Memory: 4GB
- ブートボリューム: デフォルトサイズ(46.xGB)
dfはこんな感じです。
[root@db01 ~]# df -h
Filesystem      Size  Used Avail Use% Mounted on
devtmpfs        1.8G     0  1.8G   0% /dev
tmpfs           1.8G     0  1.8G   0% /dev/shm
tmpfs           1.8G  8.8M  1.8G   1% /run
tmpfs           1.8G     0  1.8G   0% /sys/fs/cgroup
/dev/sda3        39G   14G   25G  35% /
/dev/sda1       200M  7.5M  193M   4% /boot/efi
tmpfs           364M     0  364M   0% /run/user/0
tmpfs           364M     0  364M   0% /run/user/1000
tmpfs           364M     0  364M   0% /run/user/994
不正な接続は気になりますが、接続を楽にしたいのでVMはパブリック・セグメントに作成し、踏み台(Bastion)は作りません。
一応、接続元のIP アドレスは制限します。
接続元IPアドレスの制限
VMに接続したら /var/log/secureを参照し、自身の接続元のIPアドレスを確認します。
その、IPアドレスをセキュリティ・リストのイングレス・ルールの22番ポートへの接続元IPに設定します。
OS設定
必要なパッケージを入れます。
[root@db01 ~]# yum install -y oracle-database-preinstall-19c
[root@db01 ~]# yum update -y
oracle ユーザーも作成されます
[root@db01 ~]# id oracle
uid=54321(oracle) gid=54321(oinstall) groups=54321(oinstall),54322(dba),54323(oper),54324(backupdba),54325(dgdba),54326(kmdba),54330(racdba)
SELinux無効化
[root@db01 ~]# vi /etc/selinux/config
[root@db01 ~]#
[root@db01 ~]# cat /etc/selinux/config

# This file controls the state of SELinux on the system.
# SELINUX= can take one of these three values:
#     enforcing - SELinux security policy is enforced.
#     permissive - SELinux prints warnings instead of enforcing.
#     disabled - No SELinux policy is loaded.
SELINUX=permissive
# SELINUXTYPE= can take one of three values:
#     targeted - Targeted processes are protected,
#     minimum - Modification of targeted policy. Only selected processes are protected.
#     mls - Multi Level Security protection.
SELINUXTYPE=targeted

[root@db01 ~]# getenforce
Enforcing
[root@db01 ~]# setenforce Permissive
[root@db01 ~]# getenforce
Permissive
[root@db01 ~]#
Firewalld停止
● firewalld.service - firewalld - dynamic firewall daemon
   Loaded: loaded (/usr/lib/systemd/system/firewalld.service; enabled; vendor preset: enabled)
   Active: active (running) since Fri 2022-01-14 13:55:53 GMT; 53min ago
     Docs: man:firewalld(1)
 Main PID: 1336 (firewalld)
   Memory: 0B
   CGroup: /system.slice/firewalld.service
           mq1336 /usr/bin/python2 -Es /usr/sbin/firewalld --nofork --nopid

Jan 14 13:55:53 localhost.localdomain systemd[1]: Starting firewalld - dynamic firewall daemon...
Jan 14 13:55:53 localhost.localdomain systemd[1]: Started firewalld - dynamic firewall daemon.
Jan 14 13:55:54 localhost.localdomain firewalld[1336]: WARNING: AllowZoneDrifting is enabled. This is considered an insecure configuration option. It will be removed in a future release. Please consider disabling it now.
[root@db01 ~]# systemctl stop firewalld
[root@db01 ~]# systemctl disable firewalld
Removed symlink /etc/systemd/system/multi-user.target.wants/firewalld.service.
Removed symlink /etc/systemd/system/dbus-org.fedoraproject.FirewallD1.service.
ディレクトリ作成。
[root@db01 ~]# mkdir -p /u01/app/oracle/product/19.0.0/dbhome_1
[root@db01 ~]# mkdir -p /u02/oradata
[root@db01 ~]# chown -R oracle:oinstall /u01 /u02
[root@db01 ~]# chmod -R 775 /u01 /u02
環境変数ファイルの作成
[oracle@db01 ~]$ vi .bash_profile
[oracle@db01 ~]$
[oracle@db01 ~]$ cat .bash_profile
# .bash_profile

# Get the aliases and functions
if [ -f ~/.bashrc ]; then
        . ~/.bashrc
fi

# User specific environment and startup programs

PATH=$PATH:$HOME/.local/bin:$HOME/bin

export PATH

export ORACLE_UNQNAME=cdb1
export ORACLE_BASE=/u01/app/oracle
export ORACLE_HOME=$ORACLE_BASE/product/19.0.0/dbhome_1
export ORA_INVENTORY=/u01/app/oraInventory
export ORACLE_SID=cdb1
export PDB_NAME=pdb1
export DATA_DIR=/u02/oradata
export PATH=$ORACLE_HOME/bin:$PATH
export LD_LIBRARY_PATH=$ORACLE_HOME/lib:/lib:/usr/lib

[oracle@db01 ~]$ . .bash_profile
インストール
バイナリは先にサーバに送り込んでおきます。解凍。
[oracle@db01 ~]$ cd $ORACLE_HOME
[oracle@db01 dbhome_1]$ unzip -oq /tmp/LINUX.X64_193000_db_home.zip
インストーラー実行
[oracle@db01 dbhome_1]$ ./runInstaller -ignorePrereq -waitforcompletion -silent                        \
>     -responseFile ${ORACLE_HOME}/install/response/db_install.rsp               \
>     oracle.install.option=INSTALL_DB_SWONLY                                    \
>     ORACLE_HOSTNAME=${ORACLE_HOSTNAME}                                         \
>     UNIX_GROUP_NAME=oinstall                                                   \
>     INVENTORY_LOCATION=${ORA_INVENTORY}                                        \
>     SELECTED_LANGUAGES=en,en_GB                                                \
>     ORACLE_HOME=${ORACLE_HOME}                                                 \
>     ORACLE_BASE=${ORACLE_BASE}                                                 \
>     oracle.install.db.InstallEdition=EE                                        \
>     oracle.install.db.OSDBA_GROUP=dba                                          \
>     oracle.install.db.OSBACKUPDBA_GROUP=dba                                    \
>     oracle.install.db.OSDGDBA_GROUP=dba                                        \
>     oracle.install.db.OSKMDBA_GROUP=dba                                        \
>     oracle.install.db.OSRACDBA_GROUP=dba                                       \
>     SECURITY_UPDATES_VIA_MYORACLESUPPORT=false                                 \
>     DECLINE_SECURITY_UPDATES=true
Launching Oracle Database Setup Wizard...

The response file for this session can be found at:
 /u01/app/oracle/product/19.0.0/dbhome_1/install/response/db_2022-01-15_00-59-13AM.rsp

You can find the log of this install session at:
 /tmp/InstallActions2022-01-15_00-59-13AM/installActions2022-01-15_00-59-13AM.log

As a root user, execute the following script(s):
        1. /u01/app/oraInventory/orainstRoot.sh
        2. /u01/app/oracle/product/19.0.0/dbhome_1/root.sh

Execute /u01/app/oraInventory/orainstRoot.sh on the following nodes:
[db01]
Execute /u01/app/oracle/product/19.0.0/dbhome_1/root.sh on the following nodes:
[db01]


Successfully Setup Software.
Moved the install session logs to:
 /u01/app/oraInventory/logs/InstallActions2022-01-15_00-59-13AM
rootスクリプトの実行
[oracle@db01 dbhome_1]$ logout
[opc@db01 ~]$
[opc@db01 ~]$ sudo su -
Last login: Fri Jan 14 15:47:17 GMT 2022 on pts/0
[root@db01 ~]#
[root@db01 ~]# /u01/app/oraInventory/orainstRoot.sh
Changing permissions of /u01/app/oraInventory.
Adding read,write permissions for group.
Removing read,write,execute permissions for world.

Changing groupname of /u01/app/oraInventory to oinstall.
The execution of the script is complete.
[root@db01 ~]# /u01/app/oracle/product/19.0.0/dbhome_1/root.sh
Check /u01/app/oracle/product/19.0.0/dbhome_1/install/root_db01_2022-01-15_01-01-42-755954239.log for the output of root script
[root@db01 ~]#
[root@db01 ~]# cat /u01/app/oracle/product/19.0.0/dbhome_1/install/root_db01_2022-01-15_01-01-42-755954239.log
Performing root user operation.

The following environment variables are set as:
    ORACLE_OWNER= oracle
    ORACLE_HOME=  /u01/app/oracle/product/19.0.0/dbhome_1
   Copying dbhome to /usr/local/bin ...
   Copying oraenv to /usr/local/bin ...
   Copying coraenv to /usr/local/bin ...


Creating /etc/oratab file...
Entries will be added to the /etc/oratab file as needed by
Database Configuration Assistant when a database is created
Finished running generic part of root script.
Now product-specific root actions will be performed.
Oracle Trace File Analyzer (TFA) is available at : /u01/app/oracle/product/19.0.0/dbhome_1/bin/tfactl
リスナー起動
[oracle@db01 dbhome_1]$ lsnrctl start

LSNRCTL for Linux: Version 19.0.0.0.0 - Production on 15-JAN-2022 01:08:32

Copyright (c) 1991, 2019, Oracle.  All rights reserved.

Starting /u01/app/oracle/product/19.0.0/dbhome_1/bin/tnslsnr: please wait...

TNSLSNR for Linux: Version 19.0.0.0.0 - Production
Log messages written to /u01/app/oracle/diag/tnslsnr/db01/listener/alert/log.xml
Listening on: (DESCRIPTION=(ADDRESS=(PROTOCOL=tcp)(HOST=db01.subnet10220017.vcn10220017.oraclevcn.com)(PORT=1521)))

Connecting to (ADDRESS=(PROTOCOL=tcp)(HOST=)(PORT=1521))
STATUS of the LISTENER
------------------------
Alias                     LISTENER
Version                   TNSLSNR for Linux: Version 19.0.0.0.0 - Production
Start Date                15-JAN-2022 01:08:32
Uptime                    0 days 0 hr. 0 min. 0 sec
Trace Level               off
Security                  ON: Local OS Authentication
SNMP                      OFF
Listener Log File         /u01/app/oracle/diag/tnslsnr/db01/listener/alert/log.xml
Listening Endpoints Summary...
  (DESCRIPTION=(ADDRESS=(PROTOCOL=tcp)(HOST=db01.subnet10220017.vcn10220017.oraclevcn.com)(PORT=1521)))
The listener supports no services
The command completed successfully
DB作成
[oracle@db01 dbhome_1]$ dbca -silent -createDatabase                                                   \
>      -templateName General_Purpose.dbc                                         \
>      -gdbname ${ORACLE_SID} -sid  ${ORACLE_SID} -responseFile NO_VALUE         \
>      -characterSet AL32UTF8                                                    \
>      -sysPassword SysPassword1                                                 \
>      -systemPassword SysPassword1                                              \
>      -createAsContainerDatabase true                                           \
>      -numberOfPDBs 1                                                           \
>      -pdbName ${PDB_NAME}                                                      \
>      -pdbAdminPassword PdbPassword1                                            \
>      -databaseType MULTIPURPOSE                                                \
>      -memoryMgmtType auto_sga                                                  \
>      -totalMemory 2000                                                         \
>      -storageType FS                                                           \
>      -datafileDestination "${DATA_DIR}"                                        \
>      -redoLogFileSize 50                                                       \
>      -emConfiguration NONE                                                     \
>      -ignorePreReqs
Prepare for db operation
8% complete
Copying database files
31% complete
Creating and starting Oracle instance
32% complete
36% complete
40% complete
43% complete
46% complete
Completing Database Creation
51% complete
53% complete
54% complete
Creating Pluggable Databases
58% complete
77% complete
Executing Post Configuration Actions
100% complete
Database creation complete. For details check the logfiles at:
 /u01/app/oracle/cfgtoollogs/dbca/cdb1.
Database Information:
Global Database Name:cdb1
System Identifier(SID):cdb1
Look at the log file "/u01/app/oracle/cfgtoollogs/dbca/cdb1/cdb1.log" for further details.
接続確認
[oracle@db01 dbhome_1]$ ps -ef | grep pmon
oracle    6402     1  0 01:20 ?        00:00:00 ora_pmon_cdb1
oracle    9250 32701  0 01:30 pts/0    00:00:00 grep --color=auto pmon
[oracle@db01 dbhome_1]$ sqlplus / as sysdba

SQL*Plus: Release 19.0.0.0.0 - Production on Sat Jan 15 01:30:20 2022
Version 19.3.0.0.0

Copyright (c) 1982, 2019, Oracle.  All rights reserved.


Connected to:
Oracle Database 19c Enterprise Edition Release 19.0.0.0.0 - Production
Version 19.3.0.0.0

SQL> show pdbs

    CON_ID CON_NAME                       OPEN MODE  RESTRICTED
---------- ------------------------------ ---------- ----------
         2 PDB$SEED                       READ ONLY  NO
         3 PDB1                           READ WRITE NO
tnsnames.oraの設定
[oracle@db01 ~]$ cat $ORACLE_HOME/network/admin/tnsnames.ora

PDB1 =
  (DESCRIPTION =
    (ADDRESS = (PROTOCOL = TCP)(HOST = db01)(PORT = 1521))
    (CONNECT_DATA =
      (SERVER = DEDICATED)
      (SERVICE_NAME = PDB1)
    )
  )
自動起動設定
[oracle@db01 ~]$ vi /etc/oratab
[oracle@db01 ~]$ cat /etc/oratab
cdb1:/u01/app/oracle/product/19.0.0/dbhome_1:Y
PDB自動起動設定
SQL> alter pluggable database pdb1 open;

Pluggable database altered.

SQL> show pdbs

    CON_ID CON_NAME                       OPEN MODE  RESTRICTED
---------- ------------------------------ ---------- ----------
         2 PDB$SEED                       READ ONLY  NO
         3 PDB1                           READ WRITE NO
SQL>
SQL> alter pluggable database all save state;

Pluggable database altered.
ADW+APEXで体重管理アプリ作成のマネをしてみる③ ~ APEXユーザーの作成~
目次
ここまで
アプリケーションが作成できたので、ユーザー用のAPEXユーザーを作成します。
アプリの利用者は家族を想定していて、ログイン後は全員分のデータを参照・更新可能とします。
なので、共用のユーザーを1つ作成します。
ここまでの、アプリの作成まではこちらで実施しています。
ユーザーの作成
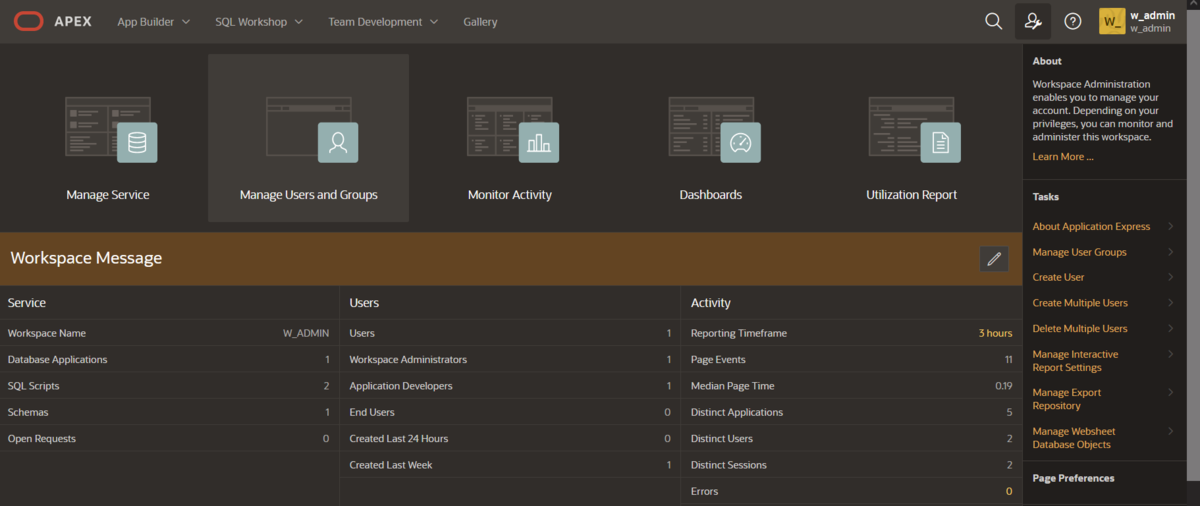
Administration画面へ遷移します

Manage Users and Groupを選択
Create User

必要項目を入力して、Create Userします
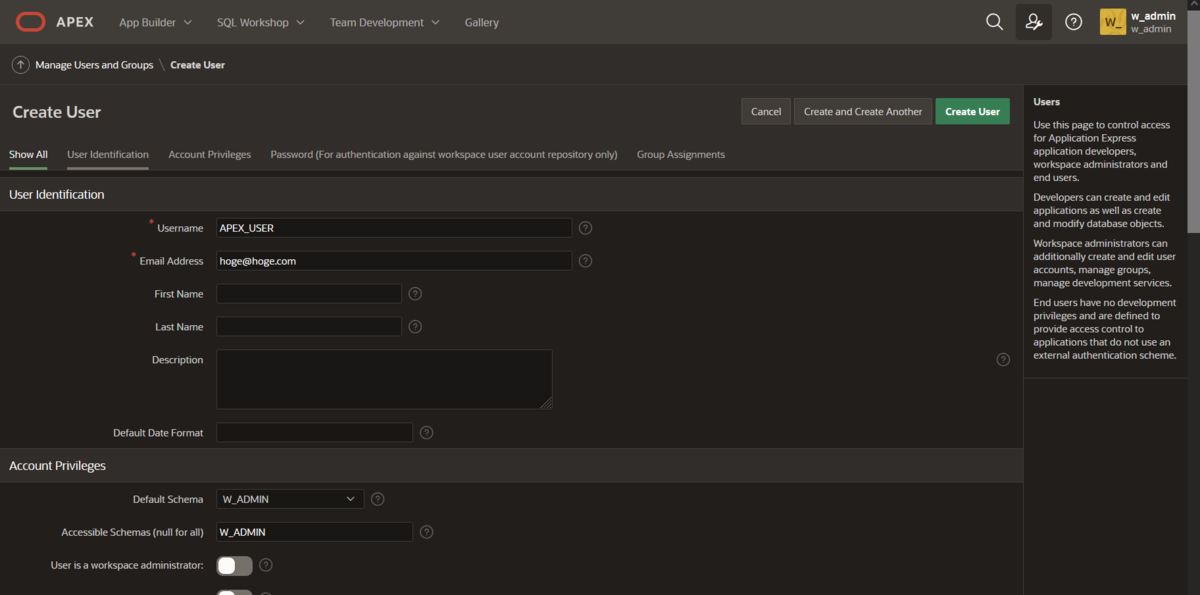
作成されます。

ログイン確認
ログインしてみます。

初回ログイン時にパスワードを変更し、変更後のパスワードでログインできればOKです。

ADW+APEXで体重管理アプリ作成のマネをしてみる② ~ アプリの作成~
目次
ここまで
Workspaceの作成はこちらで行っています。
ここからはアプリケーションを作成していきます。
他にも方法はありそうですが、入力画面をイチから作成するのが難しかったので、簡単そうだった Quick SQLから作成していく方針とします。
Quick SQLからDDLスクリプトの作成と修正
Quick SQLに遷移します


-- create tables
create table users (
    user_id                             number generated by default on null as identity
                                   constraint users_id_pk primary key,
    user_name                      varchar2(40 char)
)
;

create table weight_log (
    log_id                             number generated by default on null as identity
                                   constraint weight_log_id_pk primary key,
    user_id                        number
                                   constraint weight_log_user_id_fk
                                   references users on delete cascade,
    log_time                       date,
    weight                         number,
    memo                           varchar2(400 char)
)
;

-- table index
create index weight_log_i1 on weight_log (user_id);

-- load data
SQL Script実行
Save後の画面から、実行ボタンを押します。


アプリケーションの作成
実行結果を確認します。問題なければ Create App


作成されたアプリの確認
右上の実行ボタンを押すと、ログイン画面が開くのでログインします。

USERSからユーザーの作成


LOGから体重の入力ができます。Userの入力はプルダウンになっています。


アプリのカスタマイズ
グローバリゼーション設定
画面右上のEdit Application Properties を押します。

この変更をせずにアプリ画面からの入力すると、日付型は日にちまでの精度で表に格納されました。
この後、グラフを出力する場合に秒までの精度がないと(データが重複しないように)、グラフが崩れてしまうので、設定します。

入力項目の制限
体重の記録は入力時点の時刻でのみ記録できる様にしたいため、Log time を入力不可とし、代わりに現在時刻が自動で入力される様に設定します。
入力ページ 5-Weight Logを選択

フォーム Item中の LOG_TIMEを選択し、右ペインの Identification で Date Pickerから Hiddenに変更します

ペインをスクロールし Default で Type に SQL Queryを選択、「SQL Query」に select sysdate+9/24 from dual; を入力
※表にデフォルト値を設定する方法では、上手くいきませんでした。

ページ右上の実行ボタンを押した後に、再度、体重入力画面を確認します。Log time の入力ができなくなりました。

データを入力すると、秒までの精度で保持できていることが確認できます。

グラフの追加
1-Homeに体重のグラフを追加します


Attributes タブに切換え、Chartの Type は Line を選択します。Titleも入力します。


次に、Newとなってる Series を選択し、右ペインから以下の様に設定します。 * Identification.Name : Weight * Source.Location : Local Database * Source.Type: SQL Query * Source.SQL Query: 色々あった結果、以下とします。
select
  f.user_name,
  to_char(e.log_time,'yyyy/mm/dd hh24:mi:ss')  log_time,
  d.weight
from
  (
    select
      a.user_id,
      a.log_id,
      max(b.log_id) last_log_id
    from
      (select distinct u.user_id, w.log_id from users u, weight_log w) a,
      weight_log b
    where
      a.user_id = b.user_id
      and a.log_id >= b.log_id
    group by
      a.user_id, a.log_id
  ) c,
  weight_log d,
  weight_log e,
  users f
where
  c.user_id = f.user_id
  and c.user_id = d.user_id
  and c.last_log_id = d.log_id
  and c.log_id = e.log_id
order by
  e.log_id desc,
  f.user_id
;
ペインをスクロールして Column Mappingを設定します。
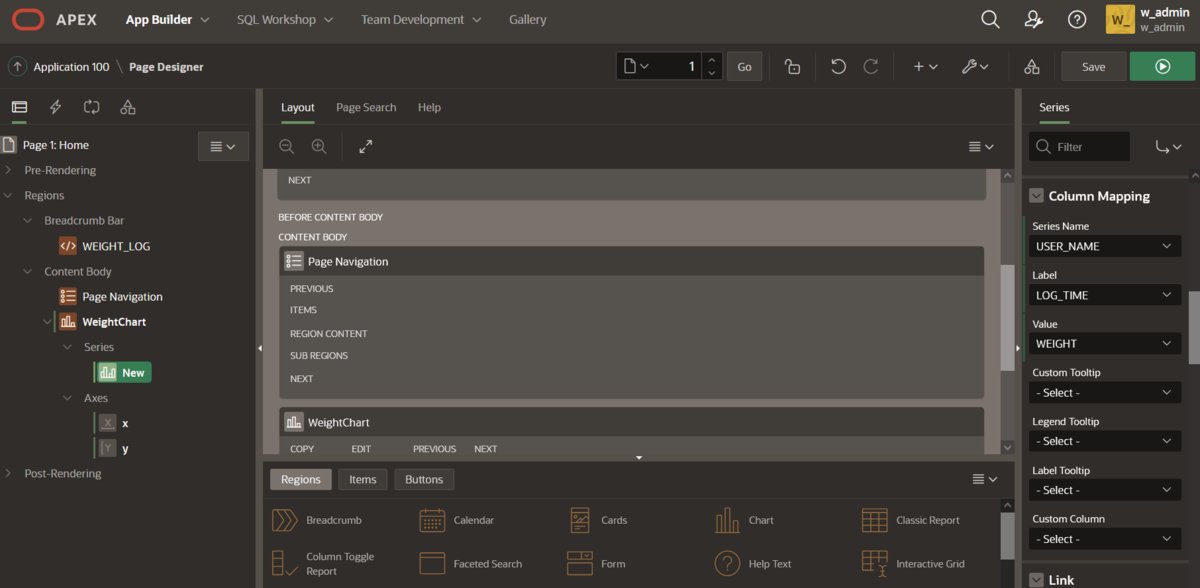
また、以下の項目も設定します。 * Line.Style : Dotted * Label: 有効 * Label.Position: Above Marker
次に、軸の設定をします。X軸、Y軸それぞれで、Identificationで Title を入力します。
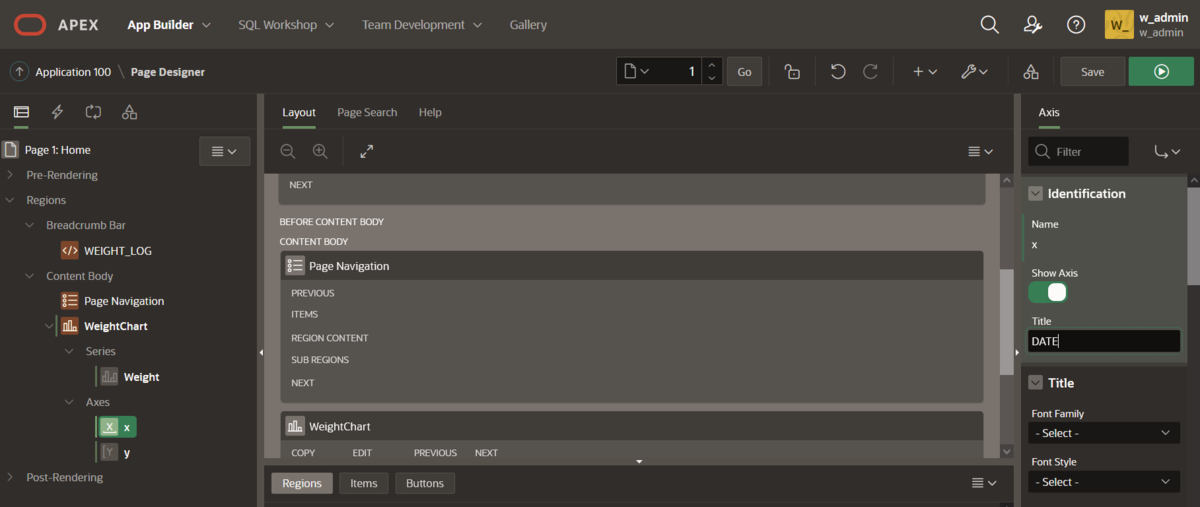
設定が完了したら画面右上の実行ボタンを押します。
グラフの確認
データをいくつか入力した上で、グラフを確認してみます。上手く表示されました ^^

以上です。
はてなの書き方
目次
見出し
見出しは 小見出し###で書く
記事の横幅
現在書かれている部分には触れずに、下記のコードを追記してください。
#container {
width: 980px;
}
#main
{
width: 600px;
}
#box2 {
width: 330px;
}
はてなブログのブログ横幅を変更する方法 - じょうまさふみのブログ
はてなブログのブログタイトルのカスタマイズ・コピペで簡単にできる! – パソコンガイド
リンク色
.hatena-urllist li a{
color: #167ac6;
}
サイドバーに目次
jQueryの設定方法 - jQueryを使用するまでの手順 |【jQuery】| 【JavaScript】 - IT the Best
【jQuery】はてなブログjQueryを導入する方法【はてなブログ改造】 - 孤毒の果て
https://www.it-the-best.com/entry/hatenablogcustom-tableofcontents_1
コードブロックを折り返さない
cssに以下を追加
pre, code {
    max-height    : 500px;
    overflow      : scroll;
    white-space   : pre !important;
    text-overflow : clip !important;
}
はてなブログのコードの埋め込みの折り返しを無効にする - たねやつの木