ADW+APEXで体重管理アプリ作成のマネをしてみる② ~ アプリの作成~
目次
ここまで
Workspaceの作成はこちらで行っています。
ここからはアプリケーションを作成していきます。
他にも方法はありそうですが、入力画面をイチから作成するのが難しかったので、簡単そうだった Quick SQLから作成していく方針とします。
Quick SQLからDDLスクリプトの作成と修正
Quick SQLに遷移します


-- create tables
create table users (
    user_id                             number generated by default on null as identity
                                   constraint users_id_pk primary key,
    user_name                      varchar2(40 char)
)
;

create table weight_log (
    log_id                             number generated by default on null as identity
                                   constraint weight_log_id_pk primary key,
    user_id                        number
                                   constraint weight_log_user_id_fk
                                   references users on delete cascade,
    log_time                       date,
    weight                         number,
    memo                           varchar2(400 char)
)
;

-- table index
create index weight_log_i1 on weight_log (user_id);

-- load data
SQL Script実行
Save後の画面から、実行ボタンを押します。


アプリケーションの作成
実行結果を確認します。問題なければ Create App


作成されたアプリの確認
右上の実行ボタンを押すと、ログイン画面が開くのでログインします。

USERSからユーザーの作成


LOGから体重の入力ができます。Userの入力はプルダウンになっています。


アプリのカスタマイズ
グローバリゼーション設定
画面右上のEdit Application Properties を押します。

この変更をせずにアプリ画面からの入力すると、日付型は日にちまでの精度で表に格納されました。
この後、グラフを出力する場合に秒までの精度がないと(データが重複しないように)、グラフが崩れてしまうので、設定します。

入力項目の制限
体重の記録は入力時点の時刻でのみ記録できる様にしたいため、Log time を入力不可とし、代わりに現在時刻が自動で入力される様に設定します。
入力ページ 5-Weight Logを選択

フォーム Item中の LOG_TIMEを選択し、右ペインの Identification で Date Pickerから Hiddenに変更します

ペインをスクロールし Default で Type に SQL Queryを選択、「SQL Query」に select sysdate+9/24 from dual; を入力
※表にデフォルト値を設定する方法では、上手くいきませんでした。

ページ右上の実行ボタンを押した後に、再度、体重入力画面を確認します。Log time の入力ができなくなりました。

データを入力すると、秒までの精度で保持できていることが確認できます。

グラフの追加
1-Homeに体重のグラフを追加します


Attributes タブに切換え、Chartの Type は Line を選択します。Titleも入力します。


次に、Newとなってる Series を選択し、右ペインから以下の様に設定します。 * Identification.Name : Weight * Source.Location : Local Database * Source.Type: SQL Query * Source.SQL Query: 色々あった結果、以下とします。
select
  f.user_name,
  to_char(e.log_time,'yyyy/mm/dd hh24:mi:ss')  log_time,
  d.weight
from
  (
    select
      a.user_id,
      a.log_id,
      max(b.log_id) last_log_id
    from
      (select distinct u.user_id, w.log_id from users u, weight_log w) a,
      weight_log b
    where
      a.user_id = b.user_id
      and a.log_id >= b.log_id
    group by
      a.user_id, a.log_id
  ) c,
  weight_log d,
  weight_log e,
  users f
where
  c.user_id = f.user_id
  and c.user_id = d.user_id
  and c.last_log_id = d.log_id
  and c.log_id = e.log_id
order by
  e.log_id desc,
  f.user_id
;
ペインをスクロールして Column Mappingを設定します。
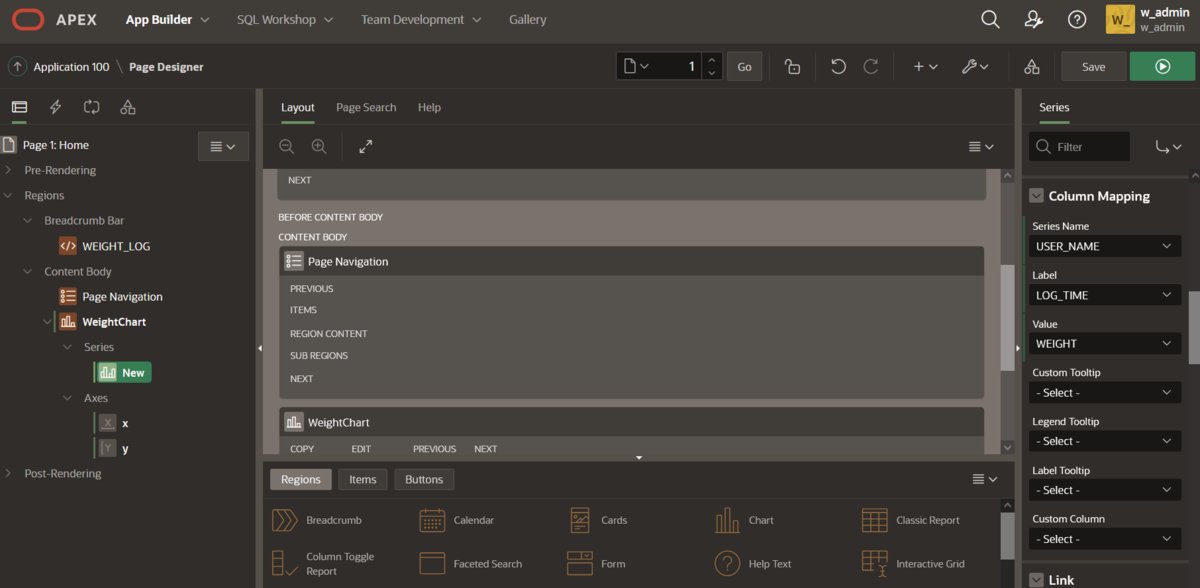
また、以下の項目も設定します。 * Line.Style : Dotted * Label: 有効 * Label.Position: Above Marker
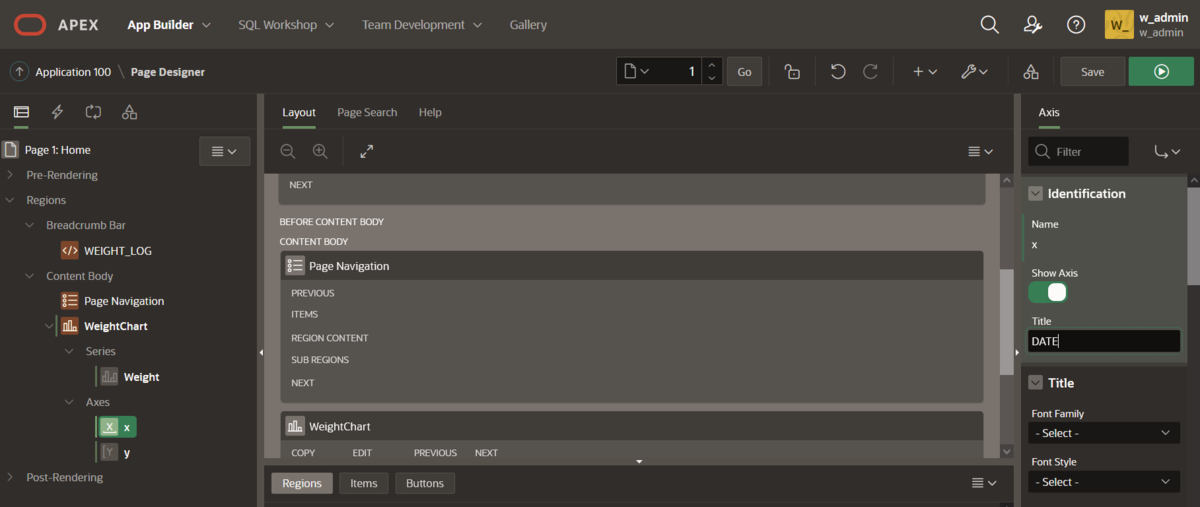
次に、軸の設定をします。X軸、Y軸それぞれで、Identificationで Title を入力します。
設定が完了したら画面右上の実行ボタンを押します。
グラフの確認
データをいくつか入力した上で、グラフを確認してみます。上手く表示されました ^^

以上です。